The Benefits of Home and Community Gardening
The importance of home and community gardens benefit society by providing health and well being for you and your community members. The positive impact of healthy food when it’s easily accessible is great for low income families. With the rising cost of fresh food caused by inflation, home and community gardens provide food with nutritional value and at the same time strengthens relationships with community ties and engagement.
Spaces to grow fruits and vegetables can thrive where there is a good source of sunlight. Spaces such as apartments with balconies and rooftops offer the best chance of sunlight. Windowsills can be an alternative especially if you choose plants that require less sunlight, such as certain salad greens and herbs. Grow lights are another option because they can mimic sun rays.
Accessibility is very important when it comes to growing fruits and vegetables. With gardening being a hobby that centres inclusion, it is important to construct garden beds that have the correct dimensions. The right height and distance between the garden beds should accommodate people who are in wheelchairs, mothers who are with kids in a stroller and ederly folks who require a walker to gain access to these foods.
From my personal experience of home gardening, there is a great deal of work and commitment when maintaing a garden. The costly price of buying soil, fertilizer and deweeding can be tiresome. That being said, the benefits of seeing progress is what makes gardening great. The skill building shared amongst friends, neighbors and family is the core strength of community gardens.
Here is a step by step video taken from my perspective of me constructing a potato garden in my backyard. My dimensions are four feet in width and sixteen feet in length. The height of my frame is ten inches.
Tools used: Twelve inch spikes, circular saw, cordless drill, inch and a quarter drill bit(¼’’), combination square, pencil, hammer, measuring tape, shovel, power cords and ten two by four lumber pieces.
Step 1: Layout your first layer of lumber by cutting your first length and width pieces. Measure three inches in length. Drill a hole (then hammer your twelve inch spike. This will be your foundation pieces, complete the same process with your width pieces.
Step 2: Cut your second layer of( length and width)lumber pieces.
Step 3: Measure, mark and cut your width pieces three inches shorter, so your third layer length pieces line up end to end of each other.
Step 4: Drill your holes, then hammer the spikes into the second and first layers of lumber.
Step 5: Measure mark and cut your final layer lengths and width pieces. Measure and drill your preset holes. Hammer the twelve inch spikes into the final layer. This will maintain the structure of the potato garden bed.
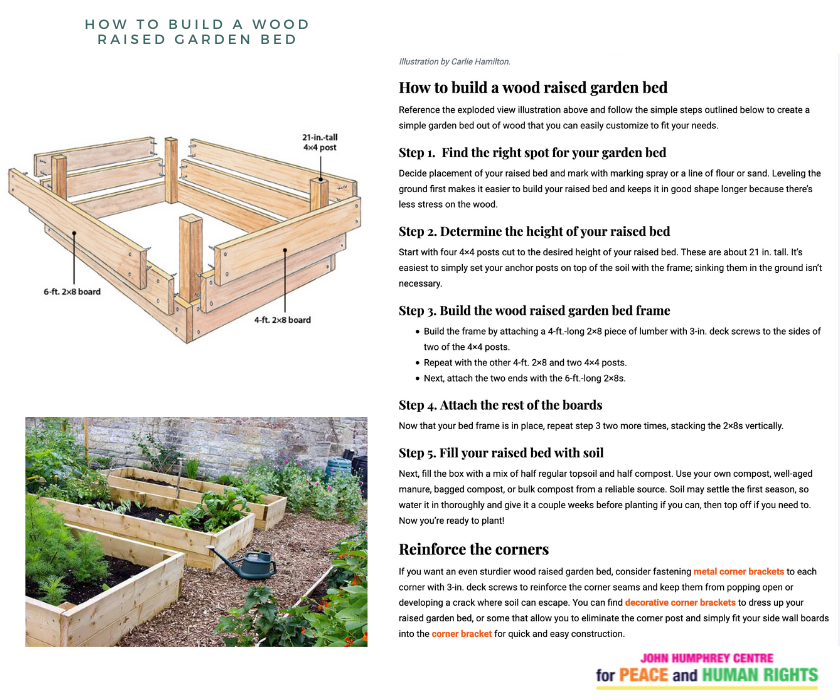
Here is another step by step How To Build A Raised Garden Bed.

